Materiales necesarios:
- Sculpey (u otra marca) arcilla liquida
- Pintura al oleo de varios colores
- Arcilla moldeable para la base
- Diamond Glaze o algun liquido cubriente de terminacion cristal
- Unos cuantos palos de madera (los palillos de los chinos van muy bien para las superficies mas grandes; para las pequenas, un palillo de dientes)

This is a new technique that I've tried out during the weekend. These is the list of materials that you'll need:
- Sculpey liquid clay
- Clay in a pottery or dark color
- Diamond Glaze for coating
- Oil paint in a few colors
- A few wooden sticks

Start by softening the clay for the base with your hands; flatten it on a surface and cut it according to your chosen shape. Now, take a bit more of the same clay and form a long and very thin line that you'll use to separate the different color spaces on your piece. When it's ready, put it in the over for ~7min to harden the base.
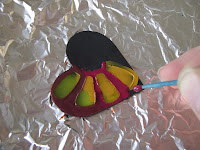
Mientras la base esta en el horno, puedes empezar a mezclar las pinturas con la arcilla liquida. Pon una pizca de color y remueve con uno de los palitos de madera para que el color se uniformice. Ten en cuenta que los colores se oscureceran mas tarde en el horno. Mezcla tantos colores como necesites. En cuando saques la base del horno puedes empezar a poner la arcilla liquida de colores sobre ella utilizando los palos de madera como en la imagen.


While the base is baking in the oven, you can mix the oil colors with the liquid clay. Put just a tiny drop of oil per color and mind that it'll get a lot darker later when you bake it. Remove it with the wooden stick until the color is fully uniform. Once you take the base from the over, you can start putting the liquid clay over it with the help of the wooden sticks you have.
Ahora al horno; sigue las indicacion de cochura (para mi eran ~30min a 265F)
Now you can put it back in the oven following the baking directions (for me, it was 30min at 265F)
Saca tu pieza del horno; estara muy caliente. Deja que se enfrie un poco, pasale un poco de papel de lija ligero por los contornos para suavizar cualquier borde arido y, tras eliminar todo el polvo de lija con un pano mojado, para terminar, ponle por encima la cobertura vidriad
 a (Diamond Glaze u otro). Dejalo secar en un sitio resguardado ya que cualquier mota de polvo se pegara a la superficie.
Y ya esta; ya tienes un colgante vidriado de vistosos colores!!
Take your pendant out of the oven and let it cool for a little (it's very hot from the oven). Now, you can sand the borders with a light sandpaper (a water one is the most indicated but I've used dry one and it's still ok), dust it with a humid towel and then cover it with the glaze liquid (still with the help of your wooden stick). Put it aside to dry and be ware of dust or insects as they'll glue to the surface.
That's all; you have now a glazed pendant in beautiful colors!!
