About Me

I currently live in Munich, Germany. Previously, I've lived in Portland (OR), Amsterdam (NL), Brussels (BE), Madrid (ES), Sheffield (UK) and Sevilla (ES).

Friday, January 14, 2011

Something different: Painting with Acrylics

With the New Year, I've started a new crafting skill... Painting!!!

To be honest, I've never been very skilled at drawing and, well, I'm not very patient when I start something new; I like to see acceptable results fast! With this being said, this holiday's period, while waiting in CDG airport for a connecting flight, I discovered a promising magazine called "Mon Atelier Creatif" (what I got is the French edition but I think the original is a German edition which I don't speak - too bad!) with step by step explanations on how to paint a few different designs using acrylics. The designs were nice and the techniques looked easy enough so I got the magazine and decided to give it a try.


A couple of weeks later and, after a visit to a couple of Art's stores, these are my first two paintings in acrylic (both of them following models from the French magazine):

Saturday, January 8, 2011

Feliz 2011!!/Happy 2011!!

After the holiday's break and all the travel craziness in the end of 2010, I'm back blogging!!! :)

So, to start with, here a few of the gifts I created for the holidays (note that the common theme this year was FELT!):

I made this case for i-Pods using a felt sheet bright pick that I measured to enclose the i-pod. Before sewing it, you need to decorate the side that will be the front. To decorate it, I used a small cut of another felt sheet in a matching color (in this case, purple) - I sewed both to the case-to-be and then glued with a hot glue gun a couple of glittering spots. After that, you can proceed to sew the felt case with a matching thread (in the case of an iPOD) don't forget to leave a small opening at the bottom for the headset to connect.

Then I made a bunch of foulard; all similar materials but using different techniques.

The first one was done using wool top and felting it with needles until the wool threads are attached to the fabric used for the foulard. The second one was done using felt sheets in different colors and cutting them in different shapes. I did attached the different shapes to the fabric using the felting needles again.

Monday, November 1, 2010

Felt designs/ Piezas en fieltro


A couple of random things I've done using felt (technique was explained in an earlier entry).


Os dejo aqui un par de fotos con cosas que he hecho con fieltro.

Textures on clay/Arcilla con texturas

La semana pasada buscando ideas online, encontre unos cuantos disenos con texturas asi que decidi probar. Este es el resultado de mis pruebas iniciales:


Above are the results of last weekend initial tests with textures.

Estos relieves los he conseguido con dos placas de siliconas que he comprado en el Craft warehouse por ~$7. El conjunto de la izquierda en color terracota es una de las placas y los dos de la derecha son con la otra placa. En los dos de la derecha he combinado el relieve de las placas con arcilla de colores liquida que he ido aplicando dentro de los relieves con un poco de paciencia y la ayuda de un palillo de dientes.

Mira en casa, a tu alreadedor, y busca objetos con relieves que puedas usar en tus disenos. Y suerte!!

The textures in these designs are the result of two different panels with textures; the two on the right are coming from the same panel and the one on the left is the other one. In the ones on the right, I've combined the textures with liquid colored sculpey with the help of a tooth-pick.
I got both silicone plaques at the Craft Warehouse for about $7 the pair.

But also use your imagination, go around your house searching for objects with texture that you could use for your clay design. Good luck!

Sunday, October 17, 2010

Glaze Clay/ Ceramica Vidriada

Una nueva tecnica que he probado por primera vez este fin de semana; ceramica vidriada.
Materiales necesarios:

  • Sculpey (u otra marca) arcilla liquida
  • Pintura al oleo de varios colores
  • Arcilla moldeable para la base
  • Diamond Glaze o algun liquido cubriente de terminacion cristal
  • Unos cuantos palos de madera (los palillos de los chinos van muy bien para las superficies mas grandes; para las pequenas, un palillo de dientes)


This is a new technique that I've tried out during the weekend. These is the list of materials that you'll need:

  • Sculpey liquid clay
  • Clay in a pottery or dark color
  • Diamond Glaze for coating
  • Oil paint in a few colors
  • A few wooden sticks
Comienzas por trabajar la arcilla que vas a usar de base, la aplanas y la cortas con la forma elegida. A continuacion, haces un hilo de la misma arcilla muy fina y la vas colocando sobre la base para definir los distitos segmentos de colores. Cuando lo tienes, metelo en el horno por unos 7min para que se endurezca un poco la base.

Start by softening the clay for the base with your hands; flatten it on a surface and cut it according to your chosen shape. Now, take a bit more of the same clay and form a long and very thin line that you'll use to separate the different color spaces on your piece. When it's ready, put it in the over for ~7min to harden the base.

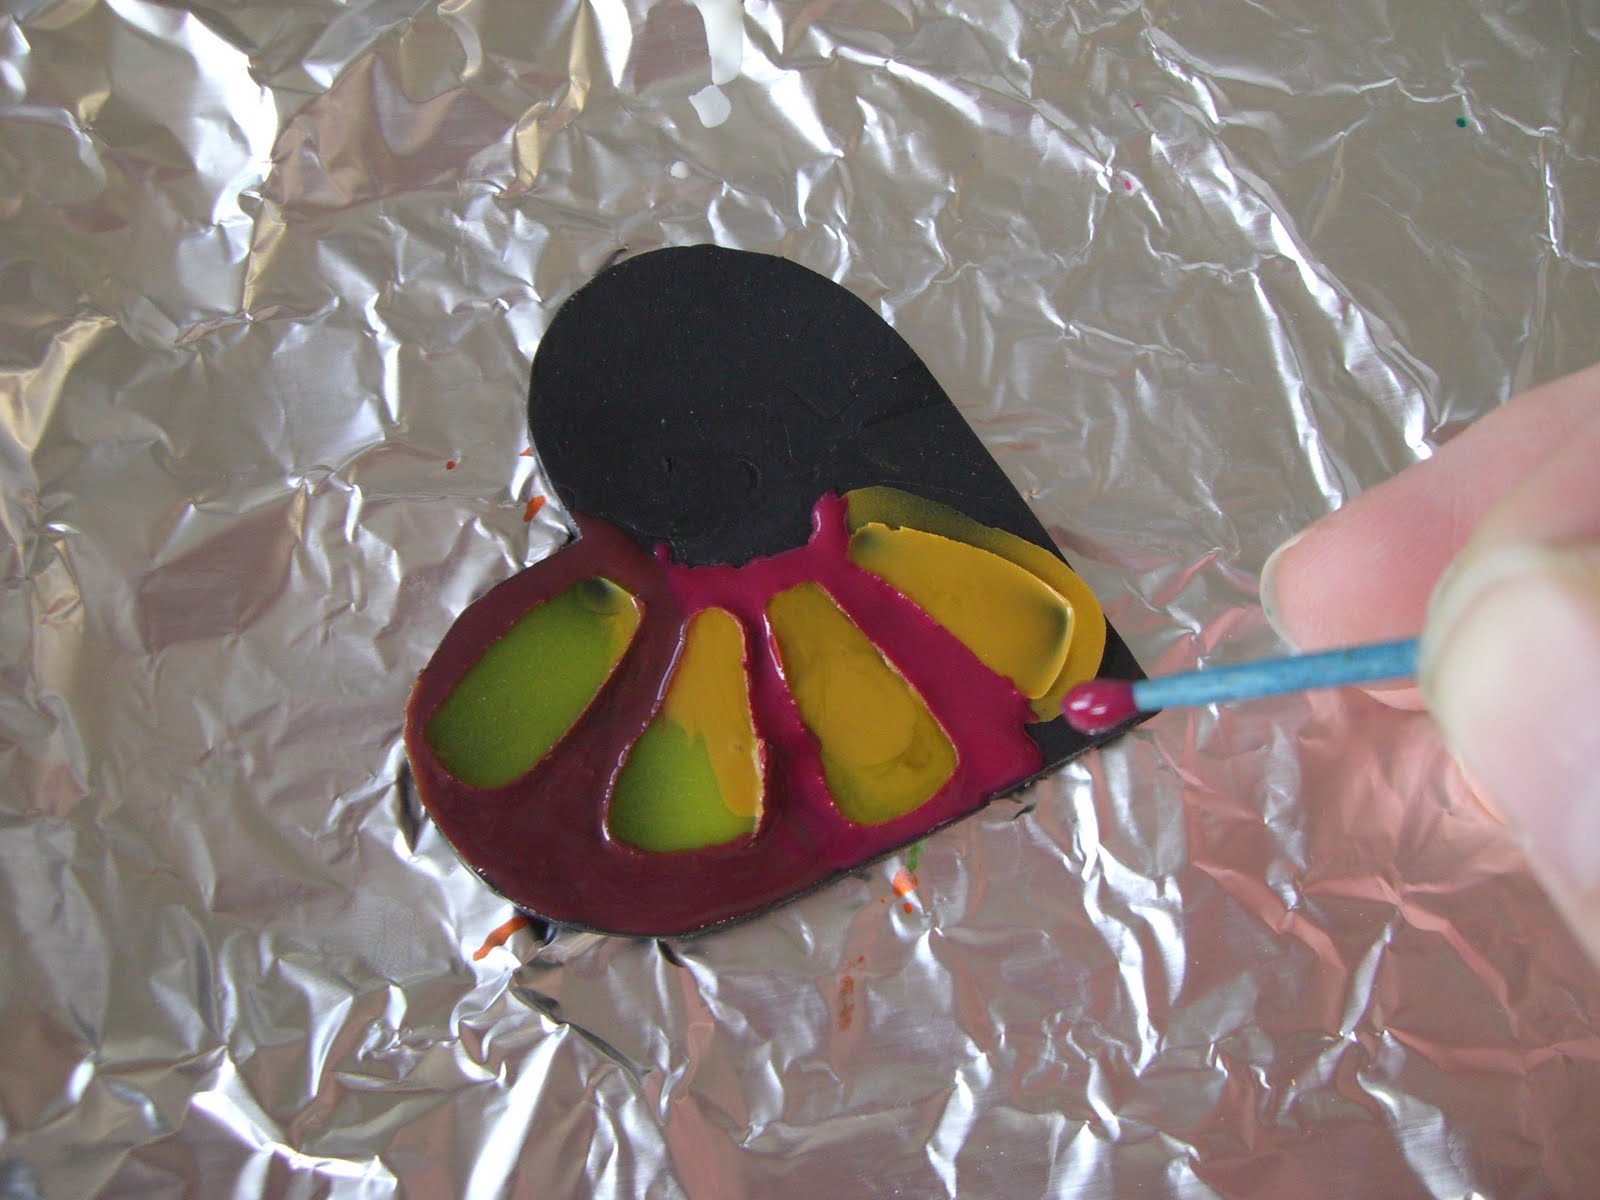
Mientras la base esta en el horno, puedes empezar a mezclar las pinturas con la arcilla liquida. Pon una pizca de color y remueve con uno de los palitos de madera para que el color se uniformice. Ten en cuenta que los colores se oscureceran mas tarde en el horno. Mezcla tantos colores como necesites. En cuando saques la base del horno puedes empezar a poner la arcilla liquida de colores sobre ella utilizando los palos de madera como en la imagen.



While the base is baking in the oven, you can mix the oil colors with the liquid clay. Put just a tiny drop of oil per color and mind that it'll get a lot darker later when you bake it. Remove it with the wooden stick until the color is fully uniform. Once you take the base from the over, you can start putting the liquid clay over it with the help of the wooden sticks you have.

Ahora al horno; sigue las indicacion de cochura (para mi eran ~30min a 265F)

Now you can put it back in the oven following the baking directions (for me, it was 30min at 265F)

Saca tu pieza del horno; estara muy caliente. Deja que se enfrie un poco, pasale un poco de papel de lija ligero por los contornos para suavizar cualquier borde arido y, tras eliminar todo el polvo de lija con un pano mojado, para terminar, ponle por encima la cobertura vidriada (Diamond Glaze u otro). Dejalo secar en un sitio resguardado ya que cualquier mota de polvo se pegara a la superficie.
Y ya esta; ya tienes un colgante vidriado de vistosos colores!!

Take your pendant out of the oven and let it cool for a little (it's very hot from the oven). Now, you can sand the borders with a light sandpaper (a water one is the most indicated but I've used dry one and it's still ok), dust it with a humid towel and then cover it with the glaze liquid (still with the help of your wooden stick). Put it aside to dry and be ware of dust or insects as they'll glue to the surface.
That's all; you have now a glazed pendant in beautiful colors!!

Monday, October 4, 2010

Colgante otoñal de arcilla/ Fall clay pendant

Necesitamos un par de hojas de colores otoñales y distintos tamaños que hayais encontrado paseando por el parque o en la calle. Tambien dos paquetes de arcilla fimo (u otra marca) en tonos otoñales y verde. Para trabajar la arcilla puedes usar un rodillo o una maquina de pasta (o con las manos tambien sirve!).To do this, we'll need a couple of autumn leafs in different sizes and two clay bars in different colors (redish/copperish and green for example). To work the clay you can use a pasta machine or simply your hands (cheaper!).


Coge un trozo de arcilla rojiza (color ceramica, bronze, marron o rojo servira) y trabajalo con los dedos hasta que quede blando. A continuacion utiliza el rodillo para aplanarlo y alisarlo. Una vez tenga unos 2-3 mm de espesor, coge la hoja que hayas identificado para el colgante colocala boca abajo sobre la arcilla. Pasa la mano por encima para que se graven bien todas las rugosidades de la hoja. Ahora coge el cutter y, con precaucion, corta la arcilla al borde de la hoja. Retira el resto de la arcilla.

After working with your hands a piece of clay, grossly mix it with a different color. Continue to flatten it on your working surface with the help of the palm of your hands or a pasta machine for a more even finish. When it is 2mm (~1 inch) thick, press one of the leaves that you've chosen as a pendant against the clay making sure that all the lines of the leaf are transferred to the clay. Now, you can proceed to careful cut around the leaf. As you go, take with your hands the left overs of clay.

Ya puedes levantar la hoja que has usado como plantilla. Utiliza el cutter para despegar la hoja de arcilla de la superficie donde la has trabajado. Una vez la has despegado, asegurate que la forma de la hoja esta como deseamos y metela en el horno sobre un papel de aluminio a la temperatura indicada.
You can now lift the leaf. You can use the clay leftovers to make small beads that you can later combine with the pendant or maybe use to make assorted earrings. (Note: if you don't have a manual drill, you might want to make holes on your pendant and beads before cooking them). Put all of this on an aluminum foil and set it in the middle of the oven (most clays need about 30min at 230F).

Atencion: si no tienes un taladrador manual para agujeros, hazle un agujero al colgante con la ayuda de un palillo de dientes redondeado antes de meterlo en el horno.

Saturday, October 2, 2010

Herramientas basicas / Basic Tools

Para aquellos que empezais, aqui va una lista de los minimos imprescindibles para ayudaros a organizar vuestra lista de la compra:

1- Alicates de puntas redondeadas. Yo uso del tipo 3 en 1; es decir, siven para cortar, para plegar y para sujetar o aplanar. Estos son los mios:

2- Elementos metalicos. De estos hay millones de variedades, estos son los mas basicos:

  • Alambres para perlas; hay de dos tipos con final plano o con enganche. Necesitaras los dos
  • Cierres de collares y gargantillas. Hay muchas variedades; cualquiera sirve
  • Aros (o anillos) de union de varios tamaños
  • Enganches de pendientes

3- Perlas y abalorios al gusto
4- Cuerdas, hilos y otros materiales para engarzar perlas
5- Una caja con compartimentos para organizar tus utensilios


Esto es lo minimo para hacer abalorios. Despues, puedes mezclar otras tecnicas y hacer abalorios en fieltro, en arcilla, con alambres... segun las tecnicas, tendras necesidad de unos materiales y herramientas u otros pero la mayoria de los materiales que he incluido en esta lista son comunes a todas las tecnicas.


This is a list of the minimum tools and materials you'd need to get started:

1- Pliers: I use the 3 in 1 type that you can use to bend, cut and hold. These below are mine
2- Metallic findings: of these there is a huge variety of shape, uses and even colors but these are the main categories that you'll need:
  • Earring hooks: different shapes... just chose what you like best
  • Head pins for beads
  • Necklaces/bracelets clasps
  • Jump rings
  • Crimps
3- A bunch of beads in different sizes, colors & materials... when you go shopping try choosing the colors you love the most as they'll inspire you.
4- Hemp cords, leather cords... mind the thickness as you'll need a different one depending on the size of the beads you're working on
5- Get a few boxes or folders to organize all your jewelry stuff